

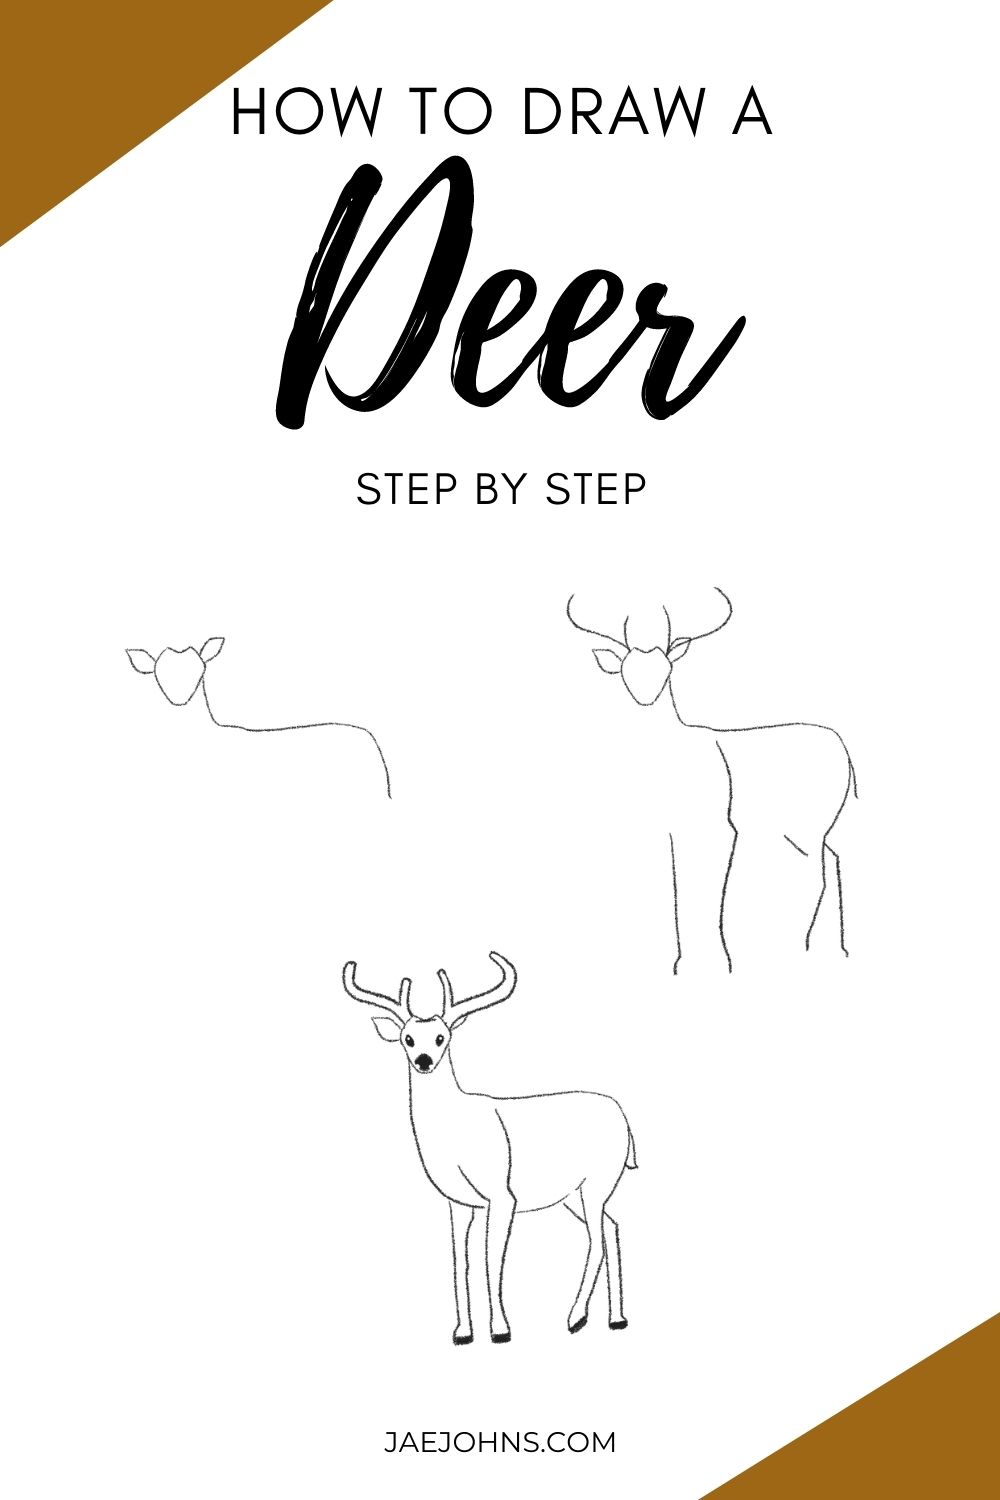
how to draw a deer step by step
Do yous retrieve drawing a deer is hard? You might recollect drawing a deer is hard.
But if y'all follow the step by stride pictures below, then information technology'll be piece of cake to depict a deer.
With these 11 steps, y'all'll be a pro at drawing a deer.
Other related topics that volition teach you how to draw
- How to Draw Dogs – Easy Step past Stride Tutorial for Cute Dogs
- How to Draw Realistic Trees Like a Pro
- How to Depict a Cute Bunny (12 Easy Steps)
- How to Draw a Rose (7 Easy Steps)
- How to Draw a Dragon (Footstep by Step with Pictures)
Step 1: Draw deer head
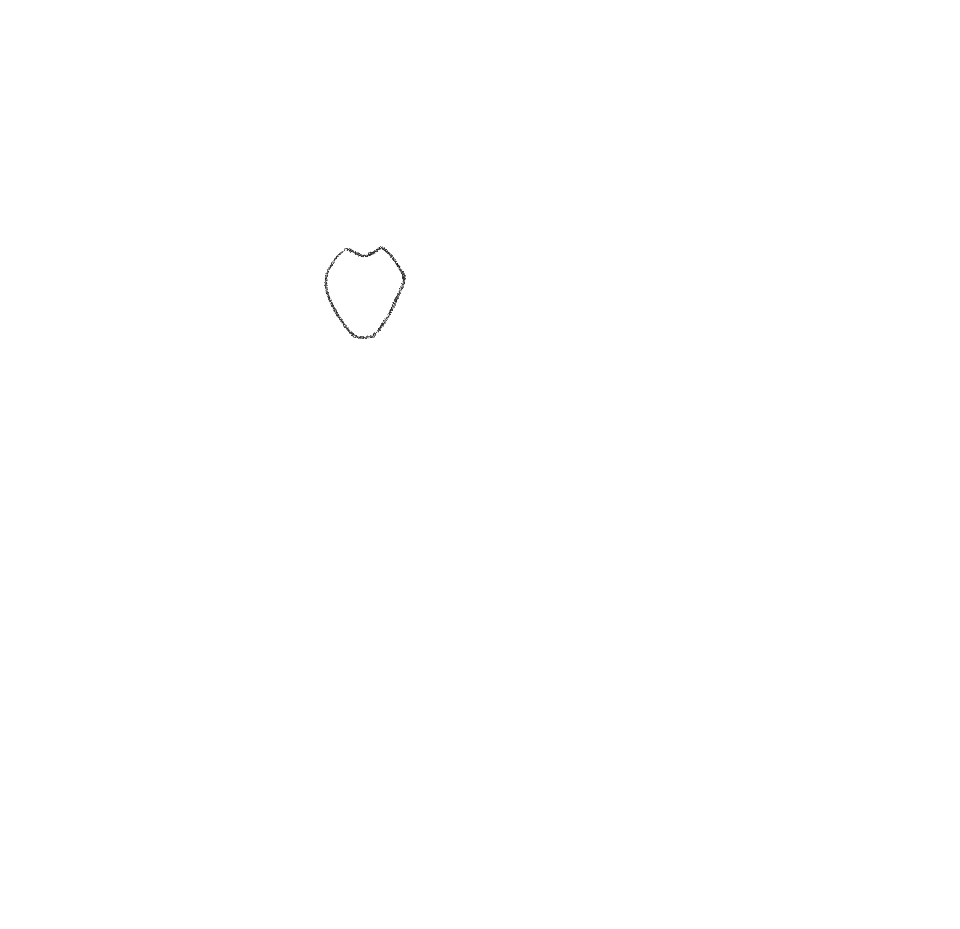
Create a blocky heart shape
Step 2: Describe deer ears
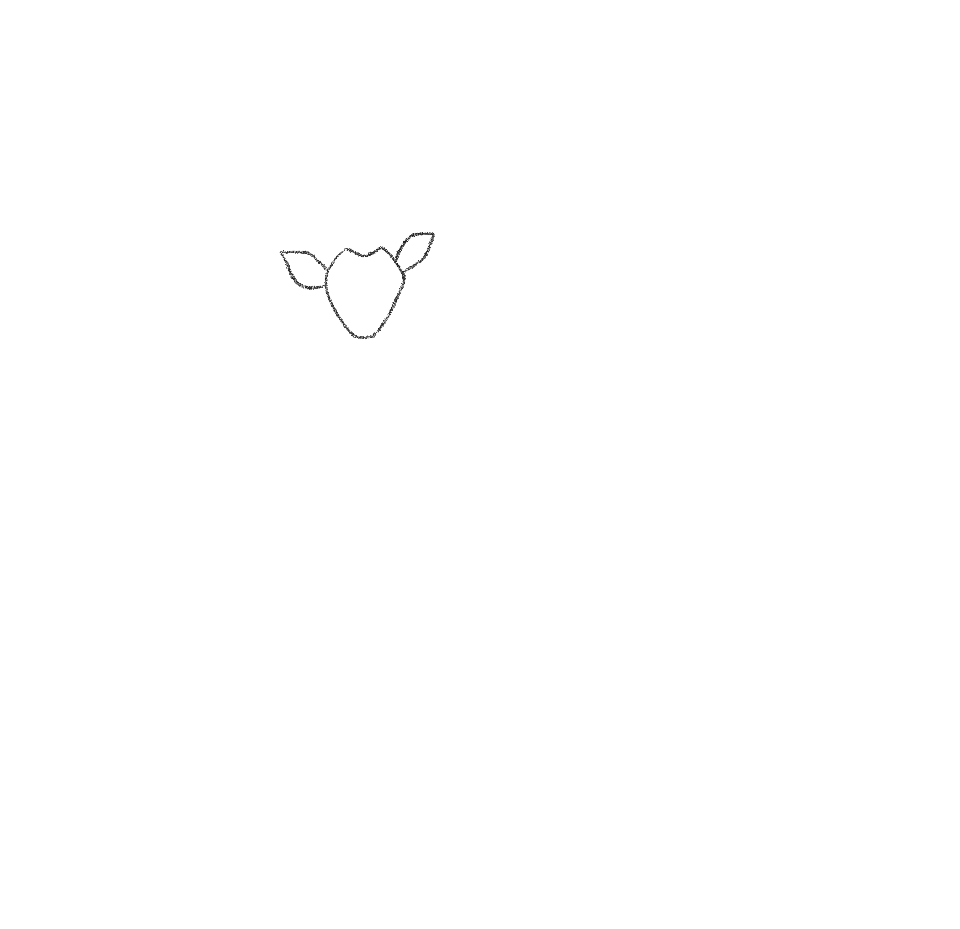
On either side of that blocky middle shape, create a leaf shape, one thinner than the other
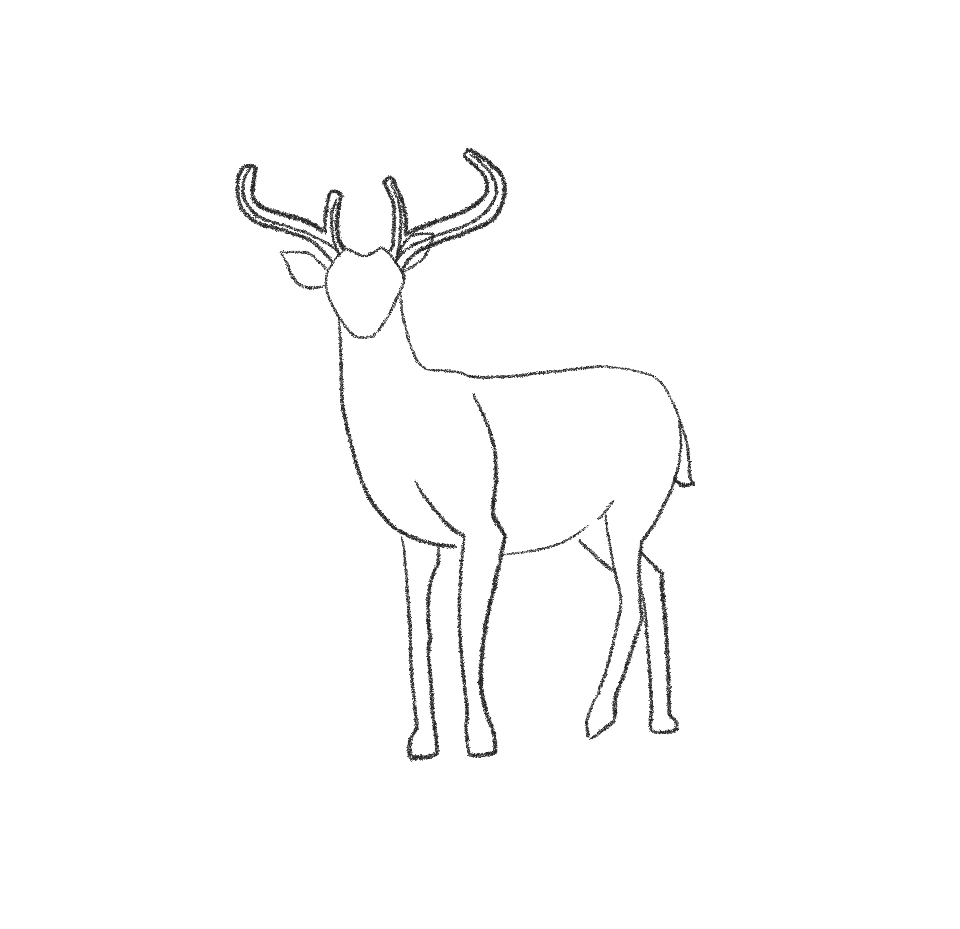
Step 3: Start drawing deer torso
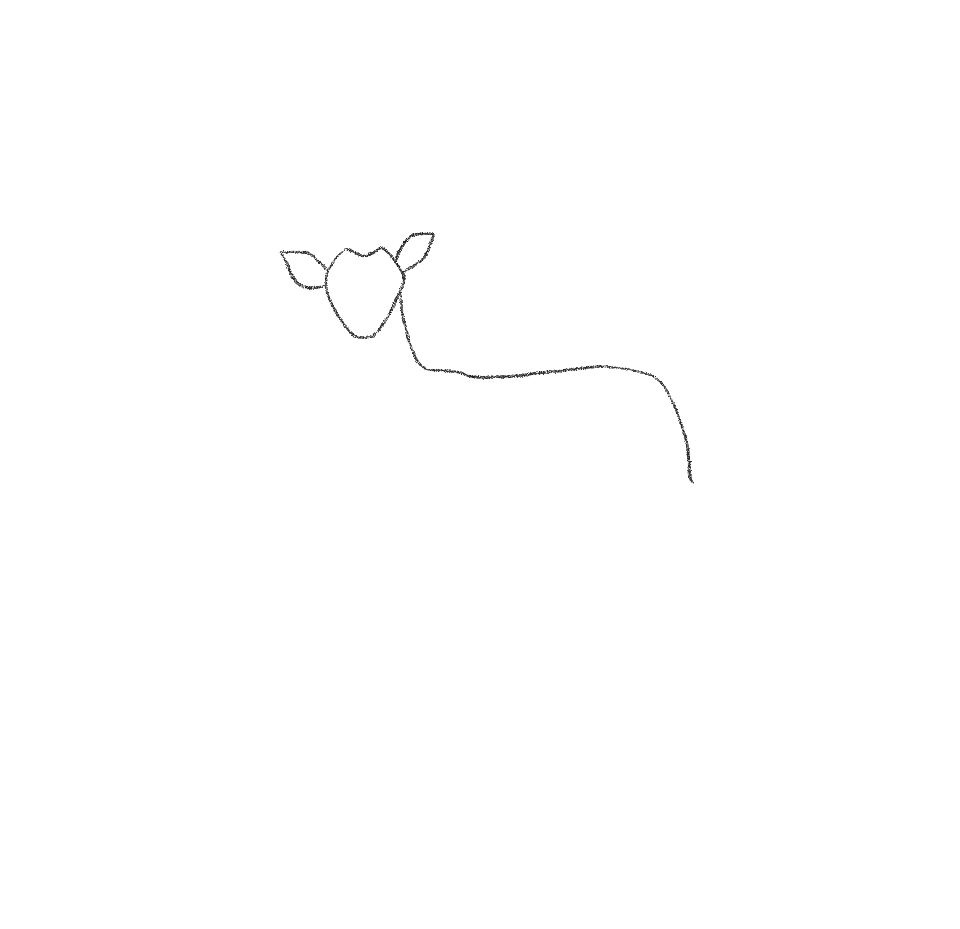
From the correct edge of the middle shape create a curved line going down, and then continue that line horizontally, finally curving downwards to outline the height part of the body.
Step 4: Depict deer antlers
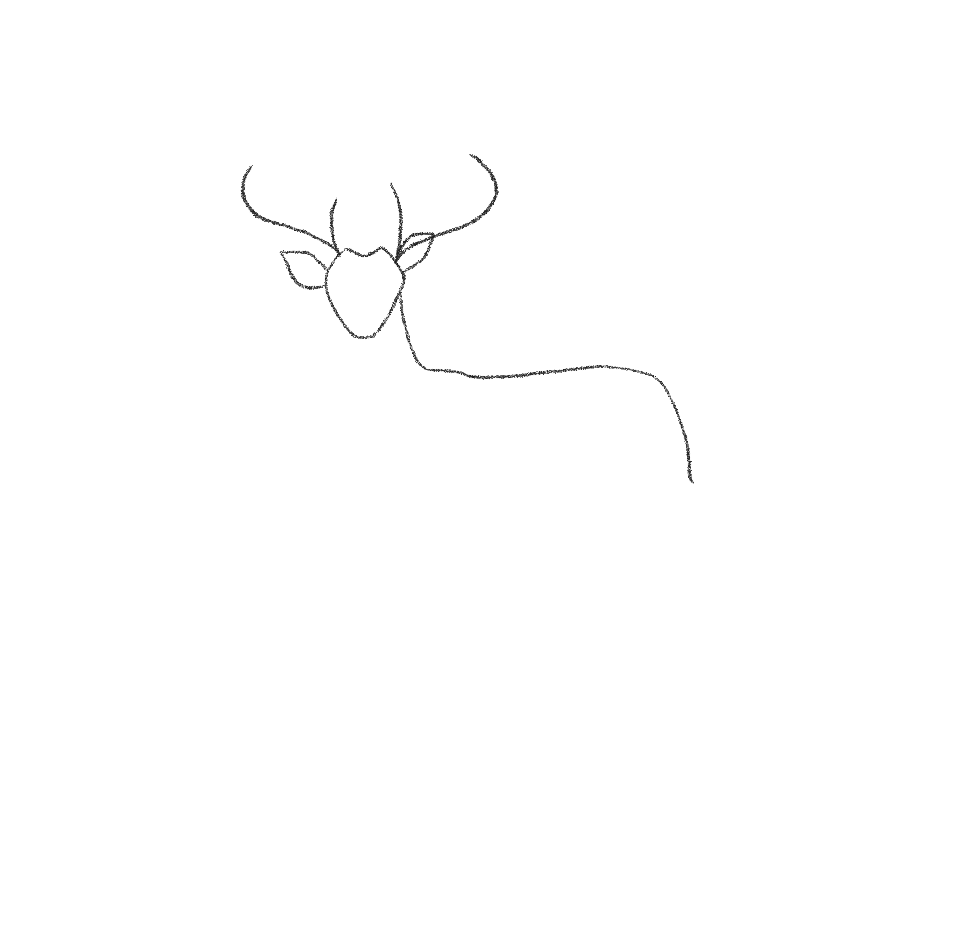
Back at the superlative of the blocky heart shape, nosotros're going to outline where the antlers come out.
From the heart of the summit edges of the heart shape, nosotros're going to make 2 lines per side.
The beginning line should be wide and curved, and the 2nd should be straighter and closer to the head.
This is going to guide us in making the antlers later.
Step 5: Start drawing deer legs
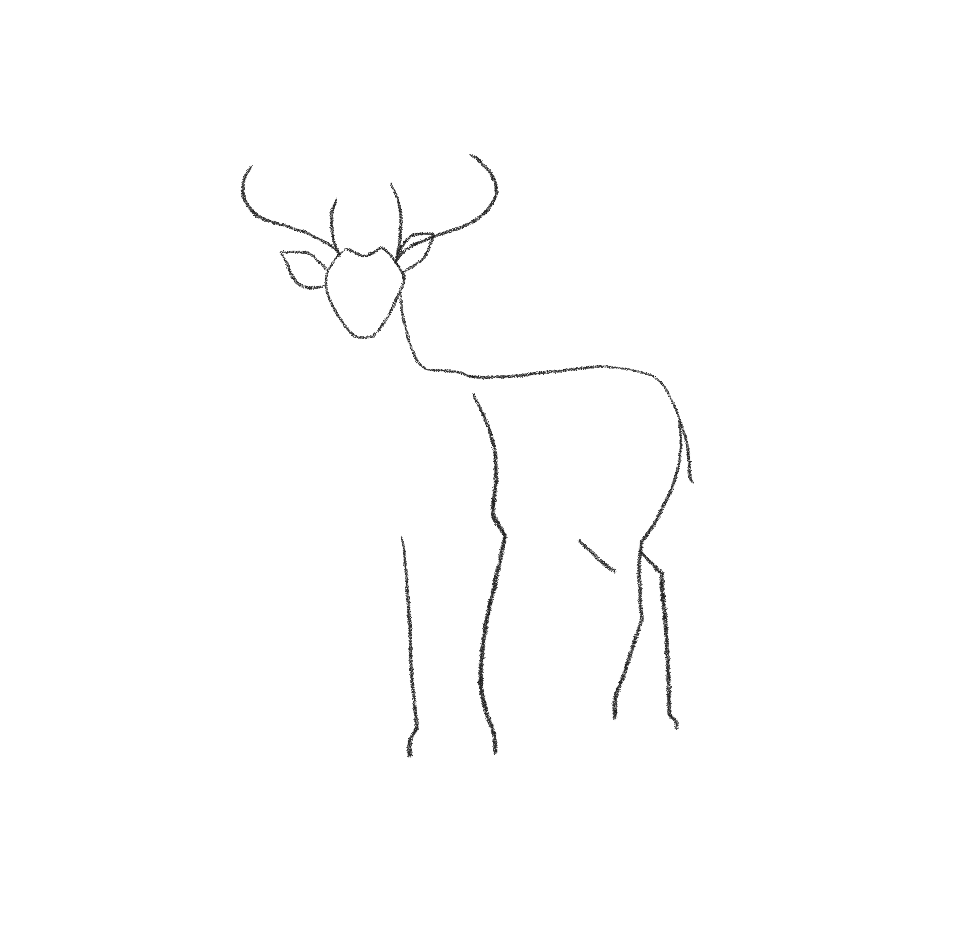
Now nosotros're going to motion to the legs.
Much similar with the dragon image we're going to outline the shape of the legs before finishing them off.
From the trunk line nosotros fabricated earlier take the large curve downward further downwards in that bend, but leave a little bit extended out for the tail.
Now, remember the unique genu shape of the dragon?
Similar to the deer, create a little bit of a precipitous edge and then bring that edge inward.
For the dorsum hind leg make a little line outward from the first dip in of the leg we just made, then bring information technology straight downward!
On the front leg, we're going to brand a long crotchet rest symbol, and finally, a niggling scrap away from that, under where the chin of the head is, we're going to make a directly line with a little curve outward at the bottom of information technology.
Step half dozen: Finish drawing deer body
Permit'southward finish that body! From the other side of the head nosotros're going to make a big curve for the cervix and chest, then stop with a little space for the front of the leg that will come later.
Backside that leg that is shaped like a rest note, we're going to make a smaller curved line for the belly!
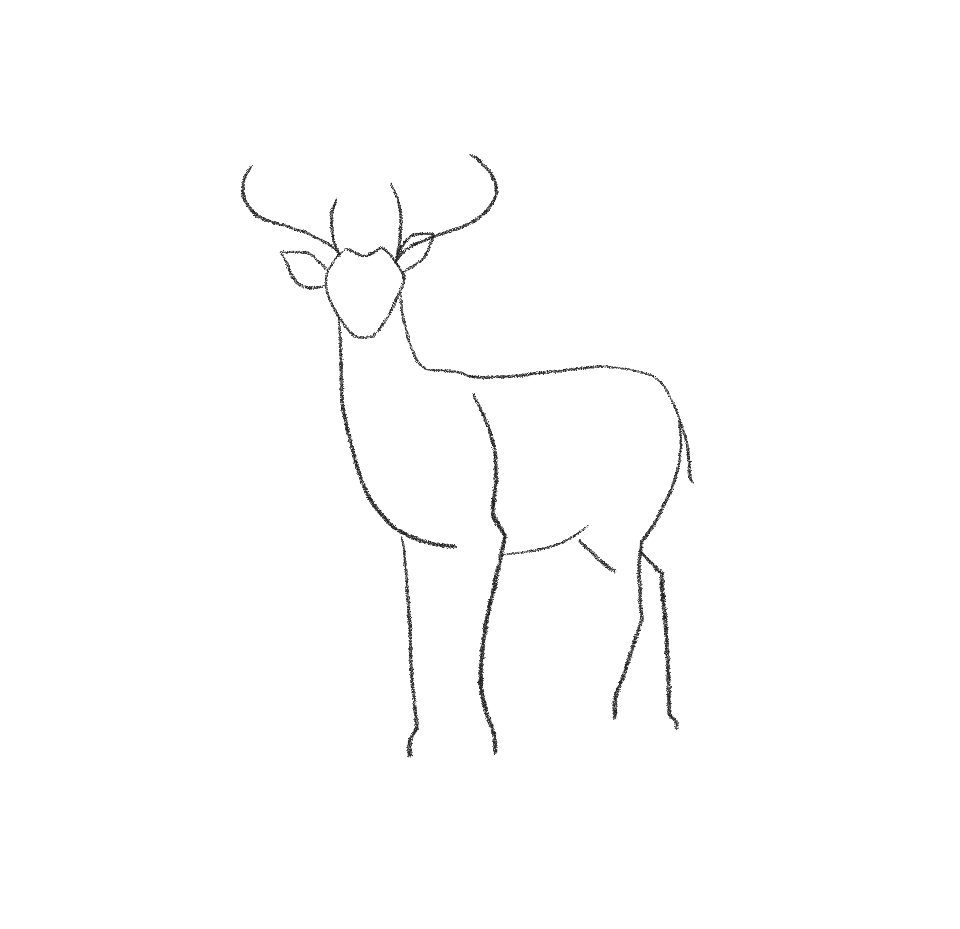
Step vii: Stop drawing deer legs
Let's terminate those legs.
Create matching lines to the guidelines nosotros made before, but don't brand them too far from the guidelines, deer have thin legs! close off those legs with a hoof by making a straight line where they connect.
Step 8: Add together deer tail and finish antlers
Now let's close off that tail line, that picayune flake of curve line we left lone earlier from the original body guideline.
Just close that upwards to the body!
Then let's get back to the antlers.
Using those lines we made before, draw a shape around them in the same shape as the guidelines, using the guidelines equally a midline.
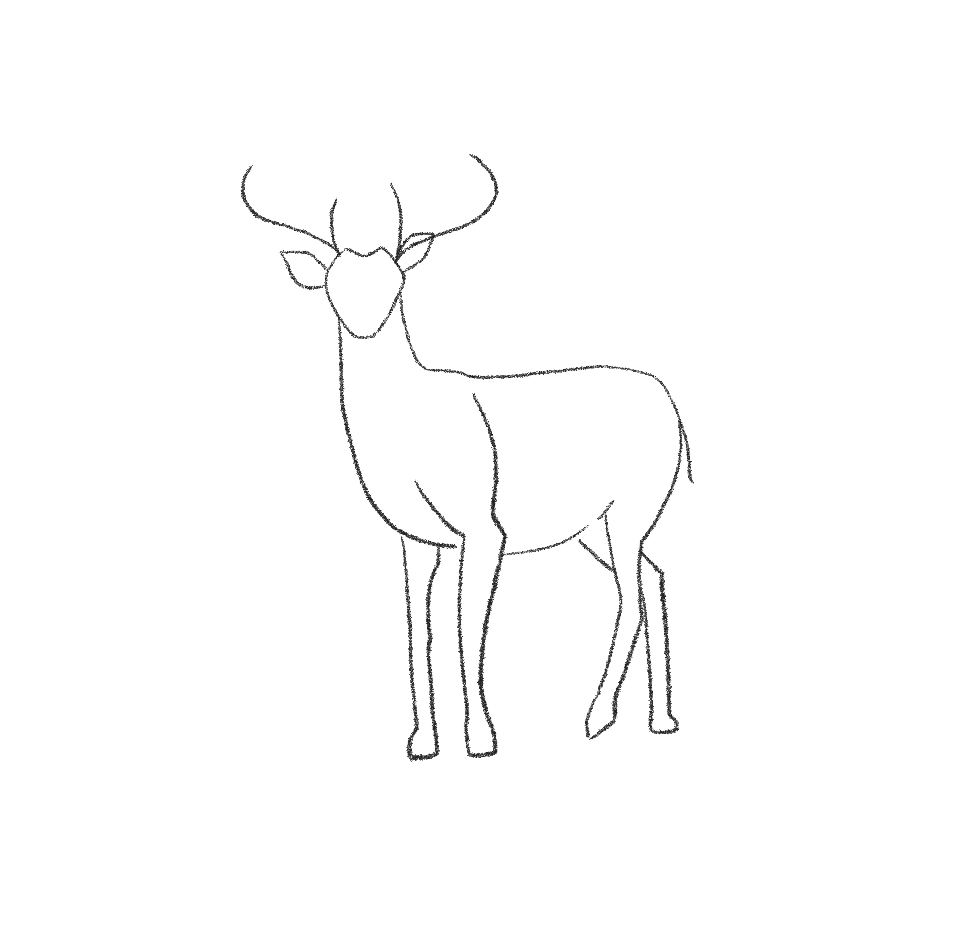
Step 9: Describe deer nose
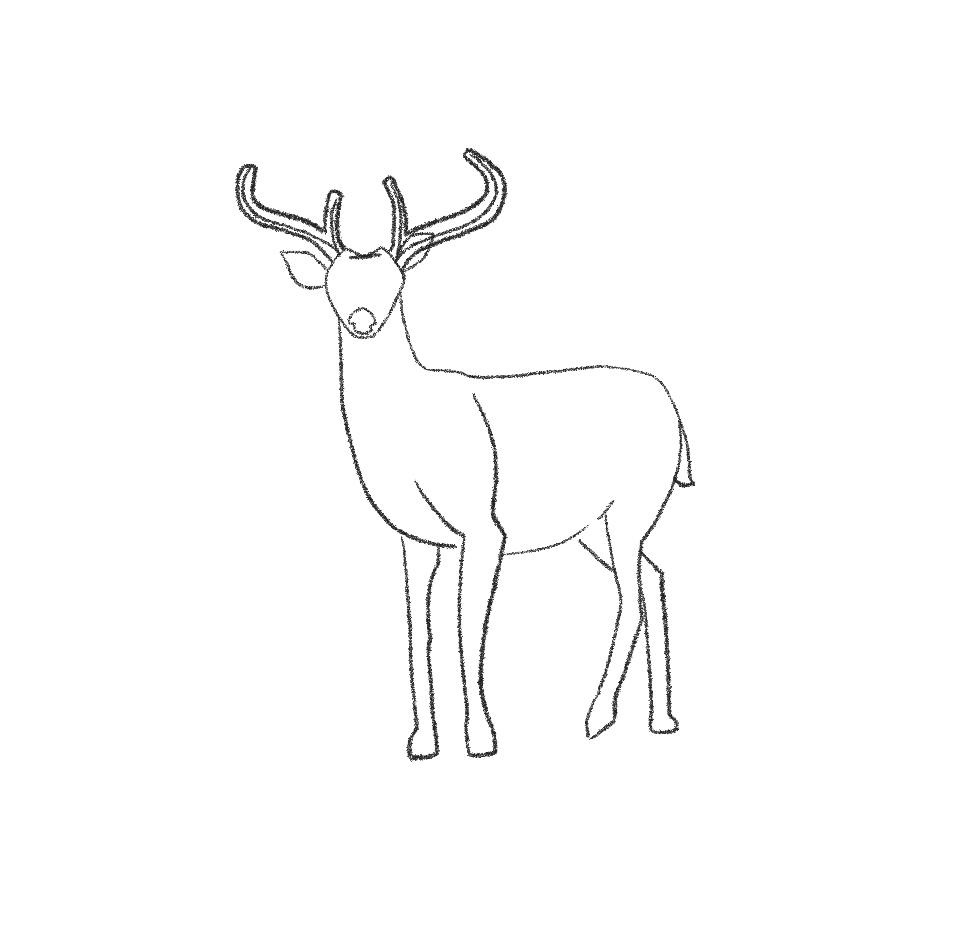
Now where that heart comes together, create a directly line going beyond, and at the end of it make a very fatty keyhole (or up arrow) shape, merely make sure it'south very fat and rounded! this is the nose!
Stride 10: Erase unneeded antler lines
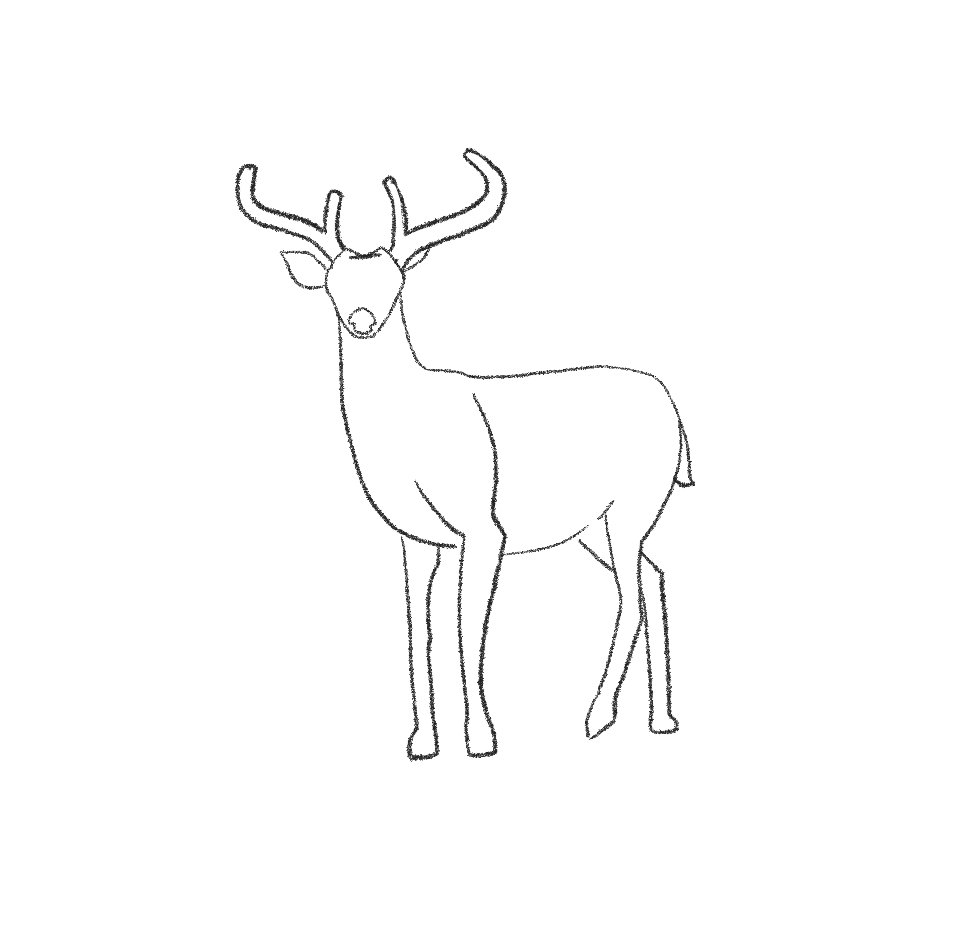
Erase the midline from the antlers and where the ear overlaps on the right (that ear is covered by the antler!)
Step xi: Finish the deer drawing
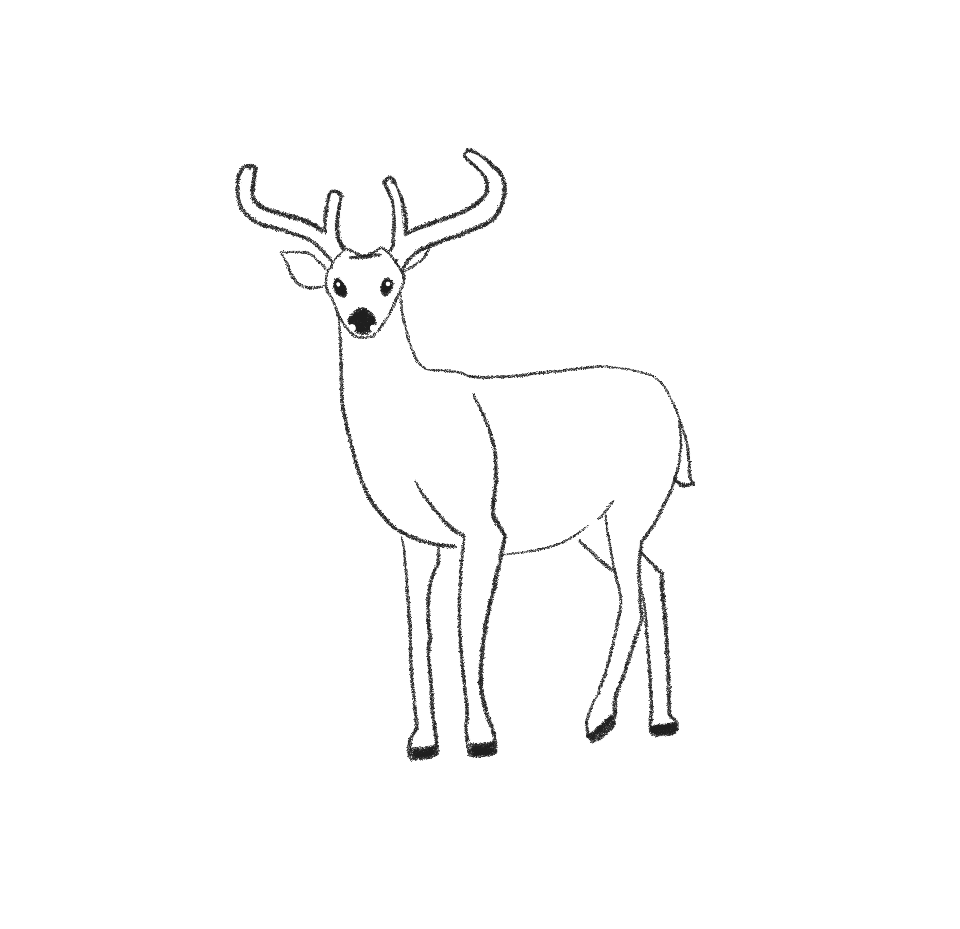
Fill in the nose and describe some <> shaped eyes, calculation a white dot for the highlights, and so make the hoofs filled in also. There you have it, a deer!
There you go! Your very own deer!
I'd like to thank Carolyn for sharing her process. Exist certain to check out her social @ClazDesign if y'all enjoyed her illustrations. She as well has some amazing prints and illustrations available in her shop.
Active Time 10 minutes
Total Time 10 minutes
Difficulty Easy
Estimated Price $0
Materials
- Pencil
- Paper
- Or tablet and stylus
Tools
- Pencil
- Paper
- Or tablet and stylus
Instructions
- Step i: Draw deer head. Create a blocky middle shape
- Step ii: Depict deer ears. On either side of that blocky eye shape, create a leaf shape, one thinner than the other.
- Stride 3: First drawing deer torso. From the right border of the heart shape create a curved line going down, and then continue that line horizontally, finally curving downward to outline the top function of the body.
- Stride 4: Depict deer antlers. Dorsum at the top of the blocky centre shape, we're going to outline where the antlers come up out.
From the middle of the elevation edges of the heart shape, nosotros're going to brand ii lines per side.
The first line should be wide and curved, and the second should be straighter and closer to the caput.
This is going to guide us in making the antlers after.
- Step 5: Start drawing deer legs. Now we're going to motility to the legs.
Much similar with the dragon image we're going to outline the shape of the legs before finishing them off.
From the body line we fabricated earlier have the large curve downward farther downward in that bend, merely leave a little scrap extended out for the tail.
At present, remember the unique knee shape of the dragon?
Similar to the deer, create a little bit of a sharp border and then bring that edge inward.
For the back hind leg brand a picayune line outward from the first dip in of the leg nosotros just made, then bring it straight down!
On the forepart leg, we're going to make a long crotchet remainder symbol, and finally, a little bit away from that, nether where the chin of the head is, nosotros're going to make a straight line with a little bend outward at the bottom of it.
- Stride 6: Finish cartoon deer body. Let'southward finish that body! From the other side of the head we're going to make a large curve for the neck and breast, then terminate with a little space for the front of the leg that volition come up after.
Backside that leg that is shaped like a residual note, we're going to make a smaller curved line for the belly!
- Step 7: Finish cartoon deer legs. Let's terminate those legs.
Create matching lines to the guidelines we fabricated before, but don't make them too far from the guidelines, deer have sparse legs! shut off those legs with a hoof by making a straight line where they connect.
- Pace viii: Add deer tail and finish antlers. At present allow'south close off that tail line, that little scrap of curve line we left alone earlier from the original body guideline.
Simply close that upward to the body!
And then let'southward become back to the antlers.
Using those lines nosotros made before, draw a shape around them in the aforementioned shape as the guidelines, using the guidelines every bit a midline.
- Pace ix: Depict deer olfactory organ. Now where that heart comes together, create a direct line going across, and at the end of information technology brand a very fatty keyhole (or up arrow) shape, only make certain it's very fat and rounded! this is the nose!
- Step 10: Erase unneeded antler lines. Erase the midline from the antlers and where the ear overlaps on the right (that ear is covered past the antler!)
- Step 11: Finish the deer drawing. Make full in the olfactory organ and depict some shaped optics, adding a white dot for the highlights, then make the hoofs filled in equally well. In that location you have it, a deer!
There you lot go! Your very own deer!
I'd like to give thanks Carolyn for sharing her process. Be sure to check out her social @ClazDesign if you enjoyed her illustrations. She besides has some amazing prints and illustrations available in her shop.

Source: https://jaejohns.com/how-to-draw-a-deer/
Posted by: smithspoe1957.blogspot.com
0 Response to "how to draw a deer step by step"
Post a Comment